Containers - Lab
Anatomy of a Container
- Containers start life as an image.
- You can think of Image just like any other packaging format, like a Tarbell.
- The difference is that container images, are made up of different layers, one on top of the other.
- When you run a container, the image is used, and a small read-write layer is added over the top.
- Every time you run a container from an image, you'll get exactly the same behavior.
- When a container stops, the read-write layer goes away.
Setting up Container in GCP
- We're going to create a Python app in Docker and we'll run this app in a Docker container and learn how to interact with local containers.
- We'll tag our Docker image and push it to a registry, and we'll do all this from inside the Google Cloud Console.
Steps:
- Open the cloud shell
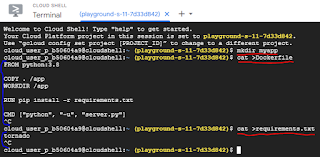
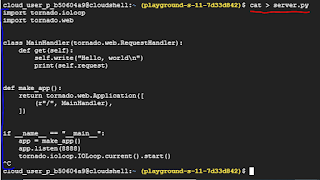
- create a folder myapp and create 3 files in it namely server.py, requirements.txt, Dockerfile
- Copy the sample code from url: https://github.com/ACloudGuru-Resources/Course_GKE_Beginner_To_Pro/tree/master/Chapter_One/Lecture_4_Lab/myapp
- Change directory to myapp using cd myapp
- Build your first container image
- See all the images created using
- Get the container id with below command
- To see all running containers use docker ps
- Test the application using curl command
- Check whats there in containers using
- Enable google container registry api 🡪 enable
- Now we can tag the image and push in container registry gcr.io
Code For Lab:
Step 1 & 2:
- server.py
- requirements.txt
- Dockerfile
Step 3 : change directory to myapp using cd myapp
Step 4 : build your first container image with below command
Step 5 : see all the images created using
Docker File Explain
- We can create a container image with a Dockerfile.
- This is just a normal text file
- It contain a set of instructions that tell Docker how to build an image.
- We can inherit from an image that already exists, like a very minimal Linux distribution, then we might add some other instructions, to copy some files into the image or run other commands.
- We can specify in the Docker file, what commands should be executed when the container is running.
- Every instruction in the Docker file creates a new layer within the image.
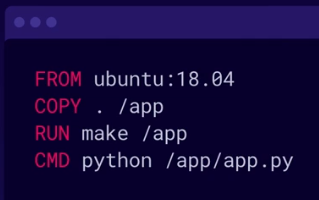
- A basic Docker File looks like.
Explain Docker File Code:
- "FROM unbuntu: 18.04":
- We inherit from a public Ubuntu image (We could inherit from anything here, including our own images.)
- "COPY . /app":
- We use the copy command to copy everything in the local directory to slash app inside the Docker image. This creates a new layer within the image.
- "RUN make /app":
- The next instruction executes the make command to compile our application.
- "CMD python /app/app.py":
- The final Command states that when this container image is running a Python Application should be executed.
Consuming Docker File
- We saved this file with the name "Dockerfile' in our local working directory alongside our code.
- To build an image with these instructions we use the Docker command line.
- The keyword built tells Docker that we want to build a new image minus t lets us add a tag or name to that to refer to it later.
- The dot at the end of the command refers to the directory the Docker should build the image from. So, dot means our local working directory.
- If you don't specify a location, or you specify a directory that does not contain a Dockerfile, the command will fail.
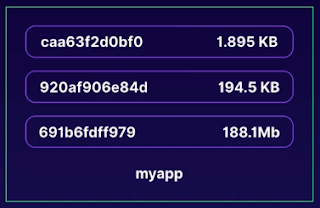
Visualization of image, once built alongside our Docker File Instructions.
- The layers are in reverse order, as it's best to imagine Docker building up adding layers from the bottom to the top.
- Each layer gets its own unique ID.
- The first and largest layer is our inherited Ubuntu image.
- The next layer at about 195k is where we've copied in our application files.
- The top most layer, represents what changed when we run the make command inside the image.
- The real benefit to developers here is containers promotes smaller shared images.
- If we make a change to this container, only the layer that has changed has to be updated. Built updates might only be a few kilobytes of changes.
- By inheriting images, we can remain consistent in our bills, and avoid reinventing the wheel with every image we create.
Step 6 : get the container id with below command
Step 7 : to see all running containers use docker ps
Step 8 : test the application using curl command
How to run a simple container:
- We simply use Docker run with the name or tag of our image.
- We can add minus d which demonizes the process and puts it in the background.
- Other options can also be add to Docker when running containers such as mounting volumes and exposing certain ports. This layer will disappear if the container is deleted.
Step 9: check whats there in containers using
Step 10 : enable google container registry api 🡪 enable
Step 11 : now we can tag the image and push in container registry gcr.io
Docker commands
The Docker command provides all the tools we need to manage our containers locally with easy to use verbs like
- $ docker ps: Shows us all the running containers.
- $ docker logs container-name: Used to view a containers logs
- $ docker stop container-name: Used to stop a container
- $ docker rm: Used to delte container entirely
- $ docker images:
- $ docker tag myapp gcr.io/myapp: Tag images
- $ docker Push gcr.io/myapp: push images to google registry
- $ docker rmi: Remove local images
In Google Cloud projects, we have a built in registry called Google Container Registry, or GCR. If we have an image locally, we can simply add an additional tag to it containing the URL of our registry using Docker tag, and then use Docker push to copy it up to the registry.


No comments:
Post a Comment